Pages

Tuesday, March 15, 2016

Apply GPO settings on non domain computers : Step by Step

Security Configuration and Analysis tool: Step by Step

Maintaining consistency in security/audit/group policy settings have been a manual task in large and diversified organizations where servers are scattered across LAN and DMZ segment of the network. Domain Joined machines actually get their common settings propagated and applied from Group Policy objects defined at the domain level but when it comes to DMZ machines which are not part of Domain it becomes a real challenge to define those settings manually and make them consistent in terms of server hardening or group policy settings.

Please note that 'not' all the settings available in Group policy can be configured using this method but for server hardening purpose, minimum security settings can be applied which contains Audit and security policies. (Everything available in Local Security Policy Snap-In)

Lets review and try our hands on a tool which has not been talked much about the Windows System administration arena.

We have a Target machine which has been fresh built with Windows 2008 R2:
Open Command Prompt type below command to see what policies are there by Default:

Auditpol /get /category:*

As we can see above, the policies defined are very minimal:

Now we will create a security database along with custom defined configuration file to apply the settings to other target machines.

Open Secpol.msc aka Local Security Policy
Start > RUN > Secpol.msc


We see that the policies are not defined at the moment.

Lets define them on this machine and then we will generate the configuration file along with security database.


We see above that settings have been defined in the tool now lets right click on the Root (Security Settings) and select Export Policy:
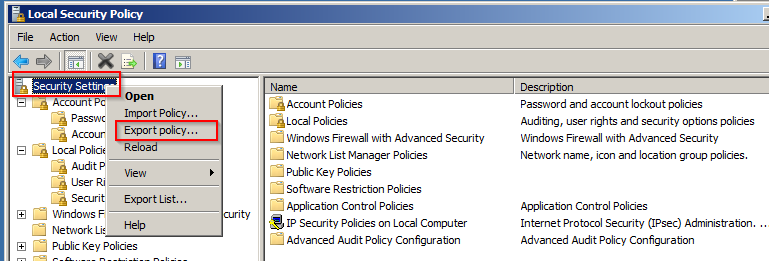

Specify a location (ex: C:\Security) and give it a name (ex: Custom.Inf), The INF file generated in the above step contains all the security settings we defined here in the previous step.

(Please note that almost all of the configuration items available in this Local Security Policy snap in is configurable and after configuring them we can generate INF file which will contain all the sttings we have defined)

Now we have a security Information file and we need to generate a Security Database file (.SDB) which will be used to configure target machines with the settings defined in the database and Config File.

Open MMC > File > Add Remove Snap-in (Ctrl +M) >  Select Security Configuration and Analysis from the available snap-ins pane > click Add > and click OK


It will add the Security Configuration and Analysis snap-in to the mmc console under Console Root
Expand Security Configuration and Analysis (click on +) > right click > select Open Database:


We don't have an SDB file yet so select the location where inf file was saved in the last step and give any name and it will create a blank SDB file and after that it will ask for the Configuration file > select the INF file located there and click Open:


Now we have SDB database file created which contains all the settings which were defined in the Configuration file.
So we have a set of two files now :
Custom.inf
Custom.sdb

Now lets go to a new machine assuming it as one of the target DMZ Machine which does not any custom policy defined yet.

Lets check the security policy settings defined on this now:
Open Command Prompt type below command to see what policies are there by Default:

Auditpol /get /category:*

It shows same as the previous server which we started with having minimal settings defined:

Now We will configure this server using the SDB and INF file we created on the previous server.

Open MMC > Security Configuration and Analysis snap-in > Right Click > Select Open Database > Select the Custom.SDB file we generated in one of the previous steps:

After opening the SDB file > Right Click on Security Configuration and Analysis and Select 
"Analyze Computer Now" 


It will ask for a Log file location, specify one and hit OK. After the progress bar disappears lets review the settings defined on system vs the settings available in the SDB file.


Notice here that the settings in right hand pane shows two columns:

Database Settings: Contains setting defined in the SDB file.
Computer Setting : Actual Setting on the computer now.

Each setting has a red cross or green check mark on it which tells if that particular setting defined on computer is complaint with that in the SDB file or not.

We can simply right click Security Configuration and Analysis again and and click Configure Computer Now... which configure the target computer with all the settings defined in the SDB File:

For example: We have defined several other settings along with a setting to rename Administrator and Guest accounts to Administrator_Renamed and Guest_Renamed.
Lets check the account status now and then after performing configuration we will check if the accounts were renamed or not.


Now lets configure the Server:

Right Click Security Configuration and Analysis Select Configure Computer Now... hit OK when prompted for the log file path.


A progress will appear and will finish.

Lets check the status of Administrator and Guest Accounts now.


 If it does not reflect you might need to do  Gpupdate /force and check the status of accounts again.
 
Open the Database file (.SDB) file again and perform another analysis to see of the settings have been applied and all items are showing with Green Check Mark Now


The above results shows that the settings have been applied successfully and settings defined in database as well as Server are all identical and have green check marks:

Lets do a final policy check on the command prompt:
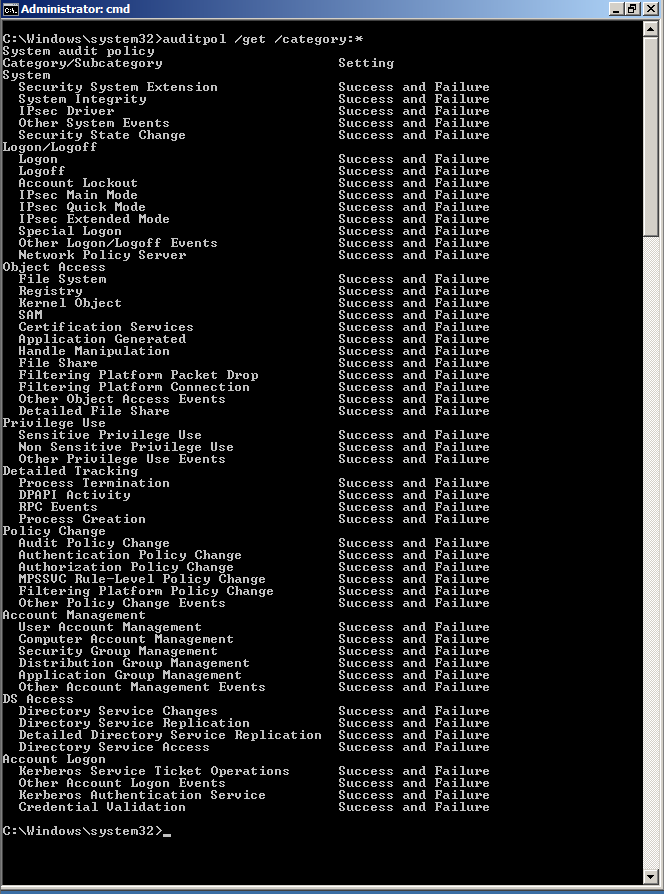
 

Review the screenshot above it shows everything defined with success and failure (Whatever we specified).

Go ahead and check in Gpedit.msc (Start > Run > gpedit.msc) and double check if all the settings we have specified have been set or not. (If they don't reflect do gpupdate /force)

Bonus Tip:
Performing Security Analysis and configuration using GUI can be a cumbersome task when we need to automate or script it to run on multiple systems so for that we have a Command line utility which accepts .SDB file and .INF File and allows us to perform analysis as well as configuration of target machines.

Analyze:
secedit /analyze /db Custom.sdb /cfg Custom.inf /log analyze.log

It will generate a Log file called analyze.log at the above mentioned location which location whic will tell you what configuration settings are defined and what is the analysis result.

Now to configure all the settings defined in .SDB and .INF file we can supply below command:

Configure:
secedit /configure /db Custom.sdb /cfg Custom.inf /overwrite /log Configure.log /quiet

It will prompt you whether you want to overwrite all the settings defined on local machine with those available in the .SDB file.

Type in "Y" to proceed with configuration.

It will generate another Log file which will show what configuration was performed successfully and once it completes you can open gpedit.msc to validate if the settings have been applied successfully or not.

Good Luck!!!


Wednesday, February 17, 2016

The following error occurred attempting to join the domain YourDomain.com: The name limit for the local computer network adapter card was exceeded.

The following error occurred attempting to join the domain YourDomain.com: The Requested resource is in use.


I was working on a Windows 2008 R2 Server which had lost its trust relationship with the domain and was not allowing us to logon to it using Domain ID.

Here are the series of checks I performed and the events in chronological order:
  • The server was reachable from outside using RDP but failing to authenticate a Domain ID.
  • The server was able to resolve internal as well as external names from inside it.
  • It was able to reach to the Domain and Domain Controller
  • Removed it from domain (added in workgroup) and tried to rejoin it back and got following error even before it could ask for the credentials: “The following error occurred attempting to join the domain YourDomain.com: The name limit for the local computer network adapter card was exceeded.” 

  •  Disabled and re-enabled the NIC but that did not resolve the issue so restarted the server.
  •  After restarting the server the above error disappeared however just after submitting credentials after putting in the domain name to join it to, I encountered a different error this time: “The following error occurred attempting to join the domain YourDomain.com: The Requested resource is in use.” 
 

  •  Deleted the Computer Account from Active Directory but even after that the same error kept appearing while attempting to rejoin the server to domain.
  •  Restarted the server again but that too did not help.
         Resolution: Pre-Staged a computer object i.e. created a computer account in AD by the same name which I was trying to join to the domain and tried rejoining again and it worked.

Happy Troubleshooting… :)


Thursday, February 4, 2016

Install Windows 10 from USB Drive

How to Install Windows using USB Flash Drive
We are in the era of micro computing where things are getting smaller in size and yet effective be it Mobile Phones/Laptops/Storage Devices etc. We have been seeing significant reduction on their size and dimensions however they are still more effective than they used to be earlier.

In new generation Laptops there are competition in the market to produce as slim/thin/compact laptop as possible which resulted in removal of several I/O Ports and Devices like LPT/Serial Ports, Floppy Disk Drive, CD/DVD Disk Drive etc.

On the Laptops without CD/DVD drive if we need to install fresh operating system (Windows 7, Windows 8, Windows 10, Windows Server 2008, Windows Server 2012, Windows Server 2016 etc) then we need to have either External USB CD/DVD drive or a USB Bootable Flash drive with Windows OS image on it.

There are several tools available out there on the Internet which enables us to create Bootable USB Flash drive but thankfully there are no tools needed if we have a system running Windows 7 or above with a CD/DVD image (ISO) to prepare a Bootable USB Flash Drive and here are the instructions:

Things Needed
1 : USB Pen Drive, 4 GB or above.
2 : A System running Windows 7 or above.
3 : Installer CD/DVD Image (Windows 7, Windows 8, Windows 10)
4 : Virtual ISO Mount tool (get one from here) (Optional**)

Insert USB drive in any of the working USB port on your system running Windows 7 or above.
Open Portable WinCD Emu.exe (Downloaded from above) and mount the ISO image of Windows Installer Disk. remember the drive letter. (ex: D:)

Open Command Prompt as Administrator (CMD Run As Admin).
Diskpart
List Disk
Select disk (x) #Enter the number from above command output for the Flash Drive
Clean
create partition primary
select partition 1
active
format fs=fat32 quick
assign letter=v
exit
xcopy d:\*.* /s/e/f v:


The last command will start copying files/folders from the mounted installer disk to USB Flash drive.

Wait for it to complete and once it does, the USB Flash drive will be ready to work as a Windows Installation media.
Boot your target computer and make sure the first boot device is set as USB Drive /USB Removable disks.

Good Luck...
Please post in comments below for any questions or comments you may have.
** While performing the steps on Windows 10 it is not needed as an ISO file can simply be mounted by double clicking the ISO file.

Failing to join a member server to Domain

Failing to join a member server to Domain
I was working on a major incident recently where-in a member server was requested to be joined from domainA.com to domainB.com (this was a multi Domain Forest with 40+ domains.)
The Member server was running on a HP DL series physical machine with Windows Server 2003 Standard Edition installed on it.
When I tried to add the server to the domainB.com by going into the system properties it attempted to locate the DC to join it to and after a minute or so it fails with following error.
"The following error occurred attempting to join the domain "domainB.com.com" The network path was not found.
09/03 16:25:08 -----------------------------------------------------------------
09/03 16:25:08 NetpValidateName: checking to see if 'domainB.com' is valid as type 3 name
09/03 16:25:09 NetpCheckDomainNameIsValid [ Exists ] for 'domainB.com' returned 0x0
09/03 16:25:09 NetpValidateName: name 'domainB.com' is valid for type 3
09/03 16:25:13 -----------------------------------------------------------------
09/03 16:25:13 NetpDoDomainJoin
09/03 16:25:13 NetpMachineValidToJoin: 'MEMBERSERVER'
09/03 16:25:13 NetpGetLsaPrimaryDomain: status: 0x0
09/03 16:25:13 NetpMachineValidToJoin: status: 0x0
09/03 16:25:13 NetpJoinDomain
09/03 16:25:13 Machine: MEMBERSERVER
09/03 16:25:13 Domain: domainB.com
09/03 16:25:13 MachineAccountOU: (NULL)
09/03 16:25:13 Account: domainB\DomainAdmin
09/03 16:25:13 Options: 0x25
09/03 16:25:13 OS Version: 5.2
09/03 16:25:13 Build number: 3790
09/03 16:25:13 ServicePack: Service Pack 1
09/03 16:25:13 NetpValidateName: checking to see if 'domainB.com' is valid as type 3 name
09/03 16:25:13 NetpCheckDomainNameIsValid [ Exists ] for 'domainB.com' returned 0x0
09/03 16:25:13 NetpValidateName: name 'domainB.com' is valid for type 3
09/03 16:25:13 NetpDsGetDcName: trying to find DC in domain 'domainB.com', flags: 0x1020
09/03 16:25:17 NetpDsGetDcName: failed to find a DC in the specified domain: 0x4cf
09/03 16:25:17 NetpDoDomainJoin: status: 0x4cf
09/03 16:25:17 -----------------------------------------------------------------


I tried to ping the domain from the MEMBERSERVER and was getting a successful resolution results and it was able to communicate with the domain via ping or nslookup.
After doing some research it was found that under Network interface card’s properties on the member server Client for Microsoft Networks was found unchecked tried to enable it but when I attempted to do so it gave a message saying  “Are you sure you want to Disable the “Client for Microsoft Networks”“ from the NICs properties? Upon Clicking Yes, the window disappears and when I open the NIC’s property to see if it was enabled it is again showing unchecked (Disabled).
What did not Work
Now I thought that of resetting the winsoc and see if that helps so supplied following commands at command prompt.
Netsh winsoc reset catalog
Netsh int ip reset
A restart of the server was initiated after the above steps, IP Addresses were assigned again since the above commands clears all network related information from the NIC but Even after resetting the winsoc did not help and the Client for Microsoft Networks was still showing unchecked and would not let me enable it.
Just for curiosity tried to join the machine back to the domain domainB.com and as expected it failed again.
What Worked
Being this a Physical server I was left with only one Idea/option in my mind and that was to uninstall the network adapters and do a rescan for hardware changes in the device manager.
Performed NICs uninstallation and did a rescan in device manager, Adapters were detected, IP details were reassigned to them and now the Client for Microsoft Networks option was editable and showing checked already.
Now I attempted to add the server back to domainB.com and Bingo!! It worked.